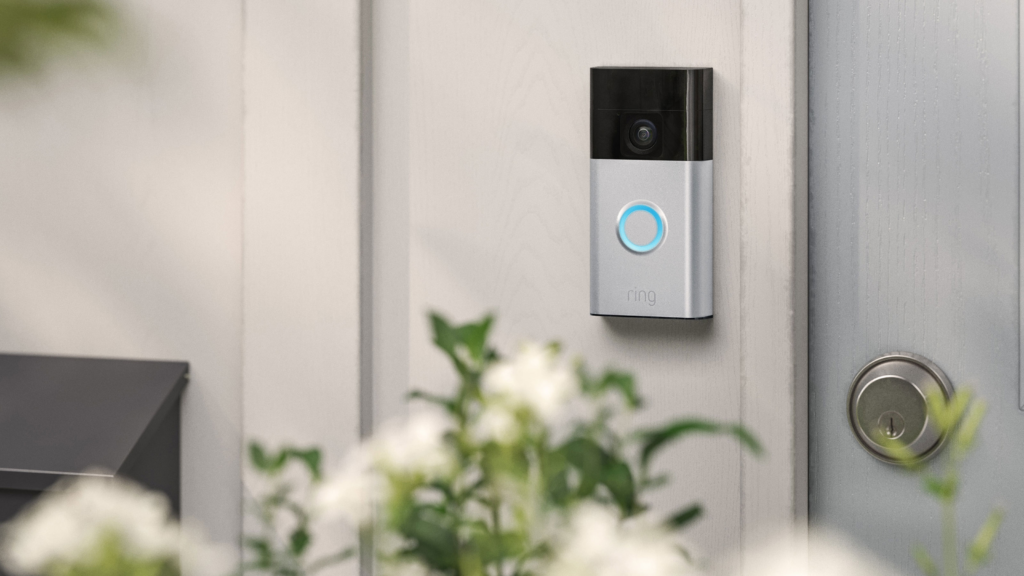
So, you’ve decided to get a Ring Doorbell. Smart move! I’ve been looking into how to wire a Ring Doorbell myself, and honestly, it can be a bit confusing with all the different models and setups.
Whether you’re replacing an old one or starting from scratch, I’m going to break down how to wire a Ring Doorbell so you can get it up and running without too much fuss. We’ll cover the basics and then get into the specifics for different situations.
Key Takeaways
- Before you start, check if you have existing doorbell wires, confirm your transformer’s voltage, and know which Ring model you have, as wiring varies.
- For homes with existing doorbell wires, you’ll connect the wires to your Ring Doorbell after turning off the power at the breaker.
- If you have no existing wires, you’ll likely need to install a new transformer and wire it, or use a battery-powered Ring Doorbell.
- Models like the Ring Doorbell Pro or Wired Doorbell Plus have specific wiring requirements, often needing a compatible transformer and sometimes a jumper cable.
- Transformer voltage is a common stumbling block; most wired Ring doorbells need an 8-24V AC transformer, but always check your specific model’s requirements.
Before You Touch Anything Check These 3 Things First
Alright, before we get our hands dirty with wires and mounting brackets, there are a few quick checks I always do. If you’re still deciding which model to install, it’s worth exploring the best smart doorbells without a subscription to find the right fit for your needs.
Does your home have existing doorbell wires?
This is the big one. Look near your existing doorbell button. Do you see thin wires running to it? If yes, great! You likely have a wired doorbell setup already, which usually makes installing a Ring Doorbell a bit simpler.
If you don’t see any wires, don’t panic. It just means we’ll need to explore other options, like using a battery-powered model or running new wires, which is a whole different ballgame.
You can usually find out if you have existing doorbell wiring by checking your electrical panel for a doorbell transformer, often a small metal box near your breaker box. This is a good first step to see if you have the basic setup in place.
Is your transformer voltage compatible? (The spec most people miss)
This is where things can get a little technical, but it’s super important. Your Ring Doorbell needs a specific amount of power, and that comes from your home’s doorbell transformer. Most Ring Doorbell models need a transformer that outputs between 16-24 volts AC.
If your transformer is too low, your Ring might not power on correctly or might have issues. Too high, and you could damage the device. It’s a detail that’s easy to overlook, but getting it wrong can mean a non-working doorbell.
You can usually find the voltage printed right on the transformer itself. If you’re unsure, it’s always better to check the Ring Doorbell specifications for your specific model or consult an electrician.
Which Ring model do you have? (Wiring differs by model)
Ring makes a few different doorbells, and honestly, they don’t all wire up the same way. Some are designed to directly replace your old wired doorbell, while others might be battery-powered or require a plug-in adapter.
Knowing your exact model is key because the instructions for wiring can vary significantly. For example, if you’re using a newer model, check out this detailed Ring Video Doorbell 4 review to understand its features, power requirements, and installation differences.
Skipping these initial checks is like trying to bake a cake without preheating the oven – you might end up with something that looks okay, but it definitely won’t turn out right. Taking a few minutes now saves you from a potential mess later on.
Once you’ve got these three things sorted, you’re ready to move on to the actual installation scenarios. It makes the whole process much smoother when you know what you’re working with from the start. Knowing your transformer compatibility is a big part of that.
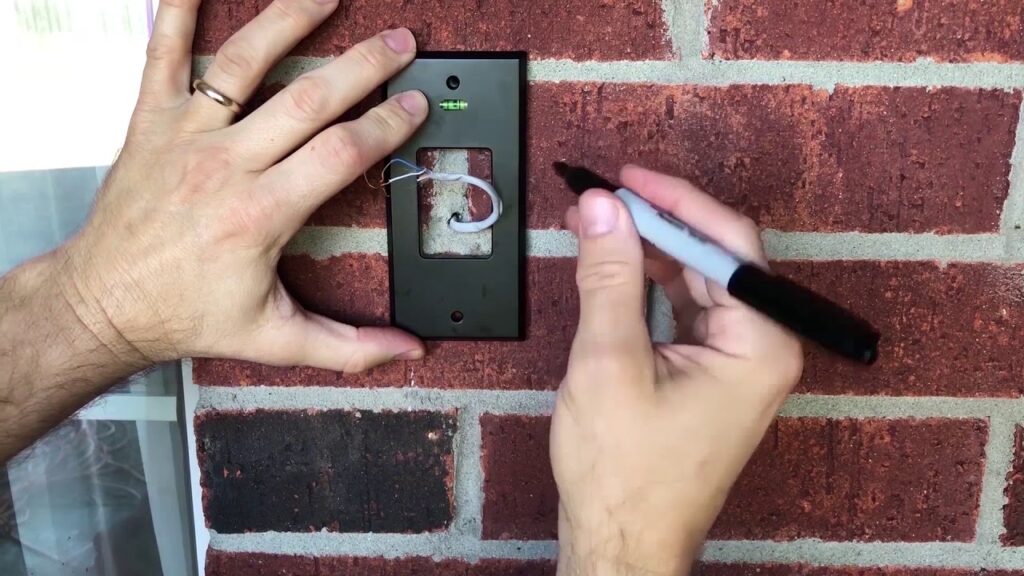
Scenario 1 Wiring a Ring Doorbell to Existing Doorbell Wires
Alright, so you’ve got those old doorbell wires just hanging out, ready for a new lease on life. This is probably the most straightforward way to get your Ring Doorbell powered up.
First things first, and this is super important: go to your breaker box and shut off the power to your doorbell circuit. Seriously, don’t skip this. Working with live wires is a recipe for a bad day.
While Ring is a popular choice for wired setups, some alternatives like the Eufy E340 smart doorbell offer local storage and different wiring requirements that might better suit certain homes.
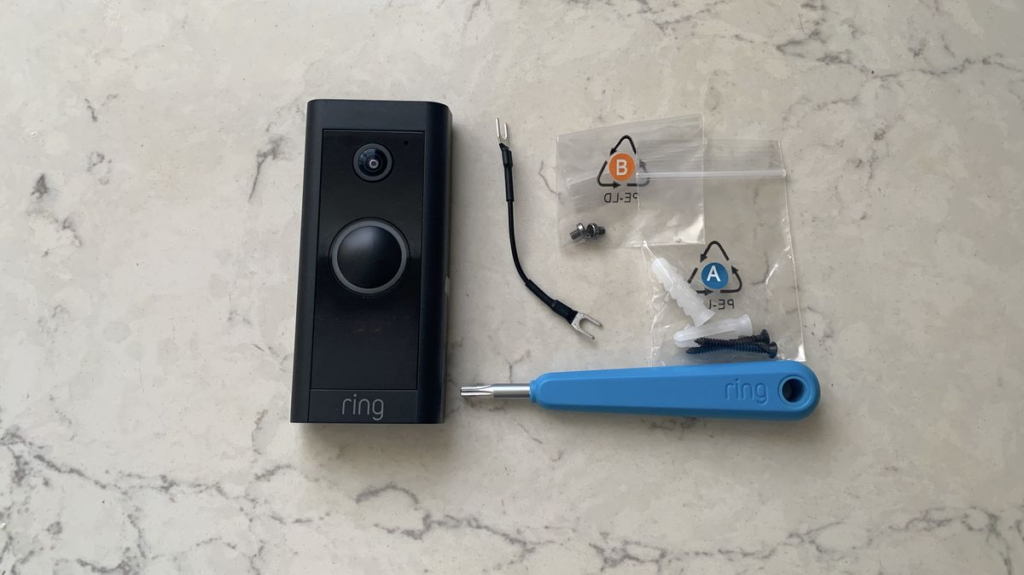
Now, grab your Ring Doorbell and its mounting bracket. Position the bracket where the old doorbell was, making sure those two wires can reach it. You’ll see two terminal screws on the back of the Ring Doorbell itself.
It genuinely doesn’t matter which wire goes to which screw, just make sure they’re both securely wrapped around and tightened down. This connection is what powers your new doorbell.
- Safety First: Always turn off power at the breaker before touching any wires. It’s non-negotiable.
- Wire Connection: Wrap one existing doorbell wire around each of the terminal screws on the back of your Ring Doorbell. Tighten the screws to secure the connection.
- Test Before Mounting: After connecting the wires, you can temporarily restore power to test if the doorbell powers on before fully mounting it.
If your existing doorbell wires look a bit corroded or damaged, it might be a good idea to clean them up a bit or even trim them back slightly to expose fresh copper before making the connection. A clean connection means a more reliable power source for your Ring.
After the wires are connected, you can mount the doorbell itself onto the bracket. Then, head back to your breaker box, turn the power back on, and follow the in-app setup for your Ring.
If everything went right, your doorbell should power up, and you’ll be ready to connect it to your Wi-Fi. If you’re having trouble with the Wi-Fi signal reaching your doorbell, you might want to improve placement or follow a complete guide on how to install a smart doorbell properly for the best signal and performance.
Scenario 2 Wiring a Ring Doorbell With No Existing Wires
So, you’ve decided to get a Ring Doorbell, but your house is like, totally new, and there are no old doorbell wires anywhere? No sweat, I’ve been there. It sounds a bit more complicated, but honestly, it’s pretty straightforward, especially if you go with a battery-powered model. You just need to make sure you have the right setup.
First off, if you’re going the battery route, which is super common for houses without existing wiring, you’ll want to make sure that battery is fully charged before you even start. I usually plug mine in overnight.
Then, you’ll set up the device in the Ring app before you mount it. This involves scanning a QR code and connecting it to your Wi-Fi. It’s way easier to do this when you’re holding the doorbell in your hand rather than up on a ladder.
Next, pick a good spot. Ring recommends mounting it about 48 inches off the ground. Try to avoid places where the sun beats down directly all day, as that can mess with the camera.
Also, double-check that you’ve got a solid Wi-Fi signal there. If not, you might need to think about a Wi-Fi signal booster later on.
Once you’ve got the location sorted, you’ll attach the mounting bracket. Most of the time, you’ll just screw it right into the wall.
If you’re dealing with brick or stucco, you’ll need to drill holes and use those little plastic anchors they give you. Just be careful not to overtighten the screws, or the bracket might bend, and then the doorbell won’t snap on right.
After the bracket is secure, you just snap the doorbell onto it and use the little security screws at the bottom to lock it in place. Since you don’t have existing wires, you’re not connecting anything to the back of the doorbell itself.
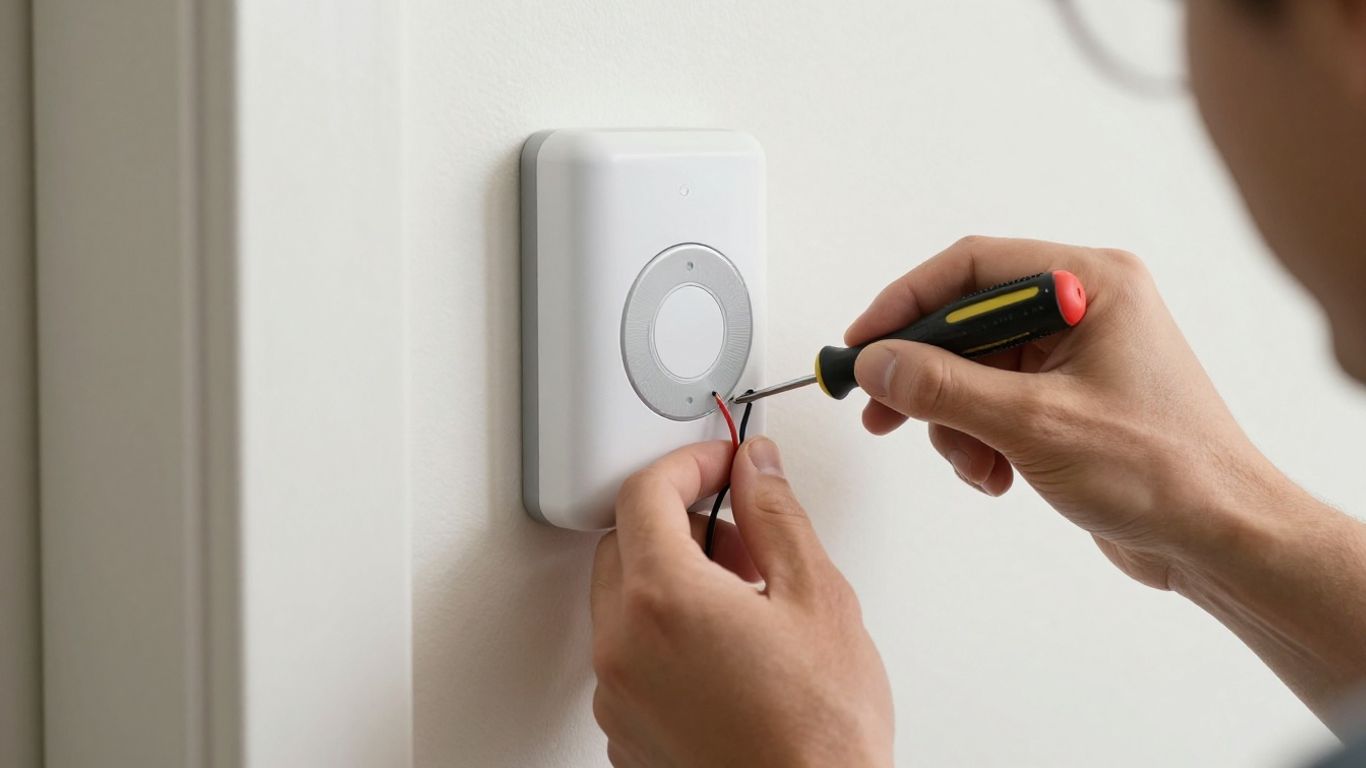
You’ll rely on the battery and your phone notifications. If you really want that classic doorbell sound inside your house, you can always get a separate Ring Chime or a Ring Chime Pro, which plugs into an outlet and acts as a chime and a Wi-Fi extender.
When you’re installing a battery-powered Ring Doorbell without existing wires, the main thing is to get the app setup done first, charge the battery completely, and pick a spot with good Wi-Fi. You’re essentially using the battery as the power source, so there’s no need to connect to any old doorbell wiring. If you want an indoor chime, that’s a separate accessory you can add later. This makes the installation process much simpler for many homeowners.
Finally, you’ll finish the setup in the app, which usually just involves confirming the Wi-Fi connection. It’s pretty painless, honestly. The whole process for a battery model without wires usually takes less than 15 minutes once you’ve got your tools ready.
It’s a great way to get smart security without needing an electrician or messing with old house wiring. You can find more details on installing battery-powered Ring doorbells if you need them.
Scenario 3 Wiring a Ring Doorbell Pro or Wired Doorbell Plus
Alright, so you’ve got the Ring Doorbell Pro or the Wired Doorbell Plus. These models are a bit different from the battery-powered ones, and they definitely need a solid connection to your home’s wiring.
It’s not super complicated, but you do need to pay attention to a few things to get it right. This is how I figured out how to hard wire a Ring doorbell.
First off, and this is super important, you absolutely have to turn off the power to your existing doorbell at the breaker box. Seriously, don’t skip this.
Working with live wires is a bad idea, and I’m not trying to scare you, but it’s just not worth the risk. Once the power is off, you can go ahead and remove your old doorbell. Usually, it’s just a couple of screws holding it on.
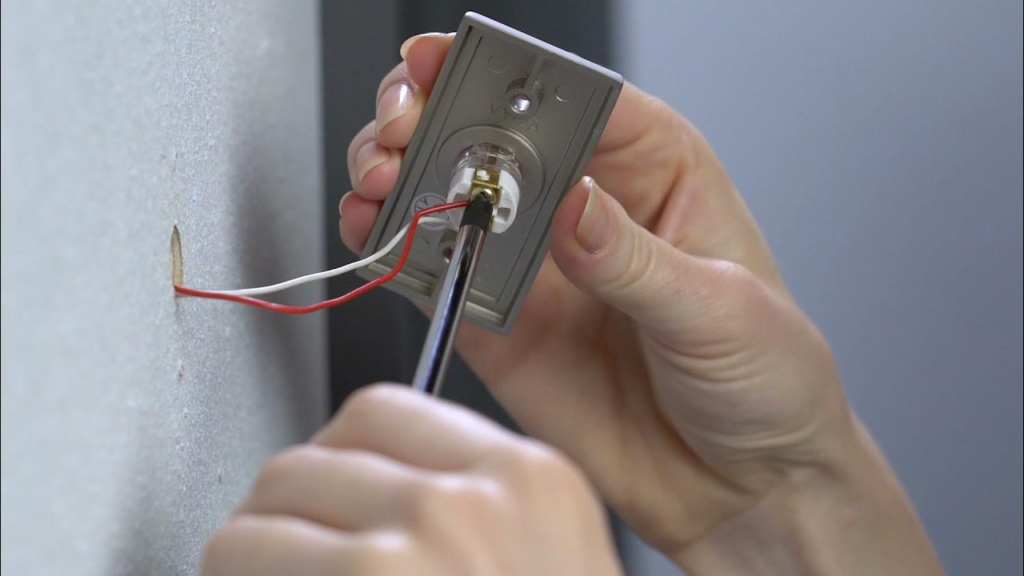
After that, you’ll see two wires. You’ll connect these wires to the back of your new Ring Doorbell. It actually doesn’t matter which wire goes to which terminal screw on the Ring device itself, which is a nice little bit of flexibility.
Then, you’ll mount the bracket and snap the doorbell into place. It’s pretty straightforward once the old one is off.
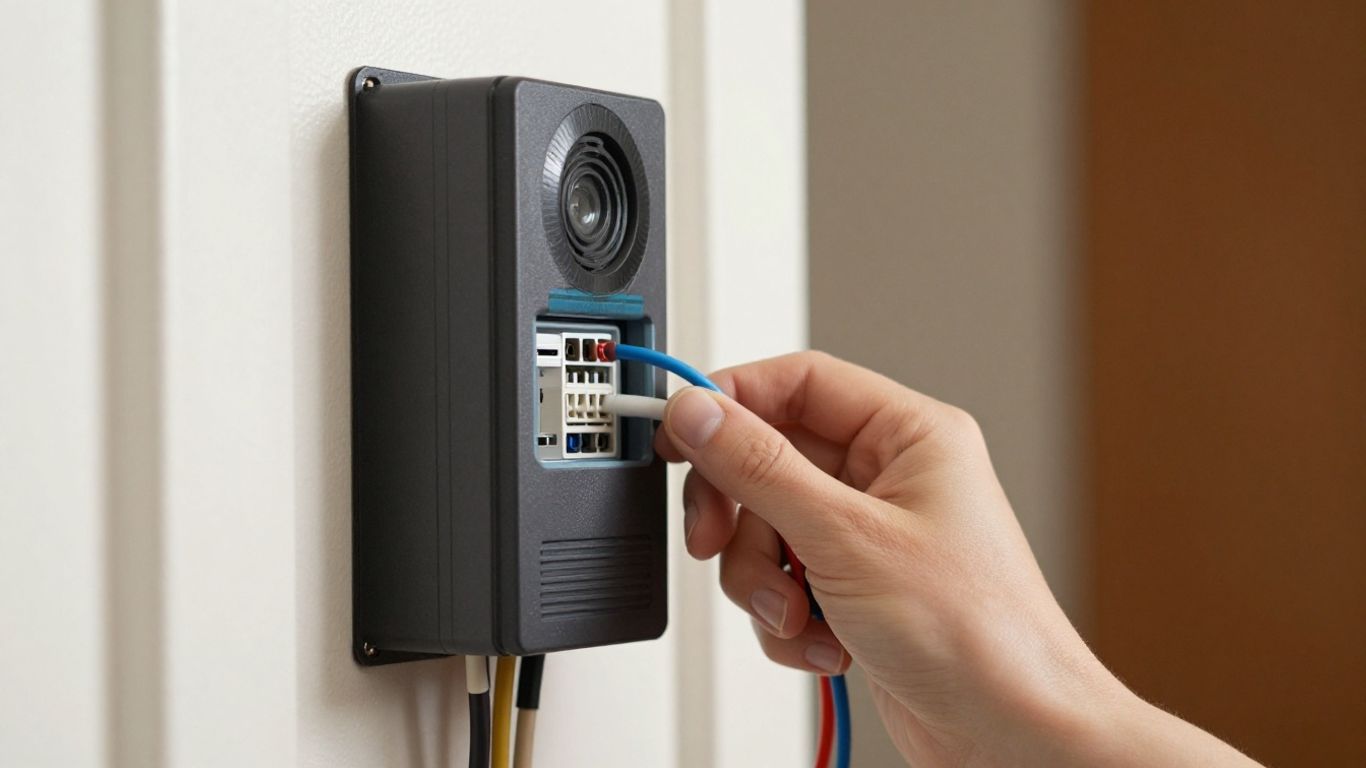
Now, for the Ring Wired Doorbell Plus and the Pro, you’ll likely need to deal with the Pro Power Kit or a Jumper Cable. This little gadget helps make sure your doorbell gets the right amount of power.
For the Wired Doorbell Plus, you’ll connect the Pro Power Kit wires to the ‘Front’ and ‘Trans’ terminals inside your existing chime box, then tuck the kit away.
If you have the Pro, you might bypass the chime altogether by connecting the wires from the chime terminals with a wire nut. It sounds a bit technical, but the instructions usually make it clear.
Remember, if you’re ever unsure about working with your home’s electrical system, it’s always best to call in a qualified electrician. They can handle the wiring safely and correctly, especially if your transformer voltage isn’t quite right for the Ring doorbell.
Once everything is connected and the doorbell is mounted, you can turn the power back on at the breaker. Then, just follow the steps in the Ring app to finish the setup. It’ll guide you through connecting to your Wi-Fi and getting everything configured.
It’s a solid way to install a wired Ring doorbell and really ups the security game for your front door. This process is key for how to install a wired Ring doorbell Pro.
Transformer Compatibility The Detail Ring’s Manual Buries
Okay, so let’s talk about the transformer. This is the part that trips a lot of people up, and honestly, Ring doesn’t make it super obvious in their main instructions.
Your Ring Doorbell needs a specific amount of power to work right, and that power comes from your home’s existing doorbell transformer. If that transformer isn’t putting out the right voltage, your Ring might not power on, or it could act really weirdly.
Most Ring doorbells, especially the wired ones, need a transformer that outputs between 8 and 24 volts AC (VAC). Some models, like the Ring Video Doorbell Wired, are pretty specific about this range.
It’s not just about having a transformer; it’s about having one that’s within the correct voltage specs. If your transformer is too low, say 5 VAC, your Ring probably won’t get enough juice.
Too high, and you risk damaging the device. I’ve seen people fry their Ring because they just assumed any doorbell transformer would work.
Here’s a quick rundown of what to check:
- Voltage Output: Look for the label on your transformer. It usually says something like “16V” or “24V”. Make sure it falls within the 8-24 VAC range specified for your particular Ring model. You can usually find this info on the transformer itself, often located near your breaker box or furnace.
- Wattage: While voltage is the main thing, wattage matters too. Ring generally recommends a transformer that’s at least 10 VA (Volt-Amps) for basic models, and often 20-30 VA for models with more features or if you’re using an in-home chime. A weak transformer might struggle to power both the doorbell and your existing chime.
- Compatibility with Chimes: If you’re keeping your old mechanical chime, you need to make sure the transformer can handle powering both the Ring and the chime. Some older transformers might not have enough power for both, leading to issues. For the Ring Pro and Wired Doorbell Plus, you might need a specific Pro Power Kit to manage power flow, especially with digital chimes.
The voltage requirement is probably the most overlooked detail. It’s easy to think “doorbell wire = power,” but the amount of power is what’s key. Get this wrong, and you’ll be troubleshooting for hours, wondering why your fancy new doorbell won’t even turn on.
If you’re unsure about your transformer’s specs or if it’s old and might be failing, it’s often best to replace it. You can find compatible transformers online or at hardware stores. Just double-check the voltage and VA rating before you buy.
If you’re really not comfortable messing with electrical components, hiring an electrician is always a smart move to make sure everything is wired safely and correctly.
Common Wiring Mistakes (And How to Avoid Them)

Alright, let’s talk about the stuff that can go wrong when you’re hooking up your Ring Doorbell. I’ve been there, fumbling with wires and wondering why nothing’s working. It’s usually something small, but it can be super frustrating.
First off, a big one is not checking your transformer voltage. Seriously, this is where I see most people trip up. If your transformer is too weak, your Ring just won’t get enough juice.
You need to make sure it’s putting out the right voltage for your specific Ring model. Ring usually recommends 16-24V AC, but always double-check your device’s manual.
Getting this wrong can lead to all sorts of weird issues, like the doorbell not powering on or constantly disconnecting. I remember a friend who upgraded their transformer to 24V and still had problems, which turned out to be a different wiring issue entirely, but the voltage was the first thing we checked.
Another common pitfall is overtightening screws. When you’re attaching the mounting bracket, especially if you’re dealing with brick or stucco, be gentle. If you crank those screws down too hard, you can actually bend the bracket.
This makes it a real pain to snap the doorbell itself into place later. Just snug them up enough so it’s secure.
And don’t forget about the placement height. It sounds simple, but mounting it too high or too low can mess with the motion detection and make it hard for visitors to be seen clearly.
Ring suggests around 48 inches from the ground for the best view. Getting the mounting right is key for the doorbell to do its job properly.
Finally, I’ve seen people get confused about connecting the wires if they do have an existing doorbell. Make sure the wires aren’t touching each other when you wrap them around the screws on the bracket.
A simple short circuit can cause all sorts of headaches. If you’re unsure about any of this, it’s always better to consult the manual or even consider getting a professional to help out.
Dealing with wires can be tricky, and it’s easy to make mistakes. Our “Common Wiring Mistakes (And How to Avoid Them)” section breaks down the most frequent errors people make.
We explain why these slip-ups happen and give you simple tips to steer clear of them. Want to make sure your home’s wiring is safe and sound? Visit our website for more helpful guides and tips!
Wrapping Up
So, there you have it. Wiring up a Ring Doorbell might seem a little daunting at first, especially if you’re not exactly Mr. or Ms. Fix-It. I know I was a bit nervous myself, staring at those wires. But honestly, after going through it step-by-step, it wasn’t nearly as bad as I thought it would be.
Now I’ve got peace of mind knowing who’s at the door, even when I’m not home. Pretty neat, right? If you’re still comparing options, check out the best smart doorbells without subscriptions or read a full Ring Video Doorbell 4 review to make the right decision for your home.
Ready to Choose the Right Smart Doorbell?
Now that you know how to install a smart doorbell, the real question is — which one is actually worth your money? Don’t guess. We’ve tested the top options so you can pick the best one for your setup.
👉 Pro tip: If you want zero monthly fees, start with Eufy. If you prefer Alexa integration, Ring might suit you better.
Frequently Asked Questions
Can I install my Ring Doorbell without drilling any holes?
Yep, you sure can! If you don’t want to drill, you can grab a special no-drill mount. It uses strong adhesive to stick right onto your door or wall. It’s a super easy way to get your Ring Doorbell up without making any holes.
How long does it usually take to install a Ring Doorbell?
For the battery-powered models, I can usually get it done in about 5 to 10 minutes. If you’re wiring it up, it might take a bit longer, maybe 15 to 25 minutes, especially if you’re dealing with old wires or need to swap out a transformer.
Is it okay to put my Ring Doorbell on a UPVC door frame?
Absolutely! It’s totally fine to mount your Ring Doorbell on a UPVC door frame. Just make sure you use the right kind of screws or one of those no-drill mounts we talked about. It’ll be secure and won’t damage the frame.
Do I really need to pay for a subscription to use my Ring Doorbell?
You can use the basic features, like seeing who’s at the door and getting live video, without paying for anything extra. But, if you want to save videos or look back at recordings, you’ll need to sign up for a Ring Protect Plan.
What’s the best height to install my Ring Doorbell?
I’ve found that mounting it about 48 inches off the ground works best. This height is usually perfect for capturing faces clearly when people are standing at your door.
Will my Ring Doorbell work if it gets rained on?
Most Ring Doorbells are built to be weather-resistant, so a little rain or snow won’t hurt them. However, they aren’t meant to be completely underwater, so don’t go dunking it in a bucket!