If you have a battery-powered doorbell (Eufy E340, Ring Video Doorbell 4, or Aqara G4 in battery mode), then go to the wireless installation section. No wires, no electrician, no tools except a screwdriver and drill.
The process is similar to if you are replacing an existing wired doorbell with a smart one, so it should be simple enough for many homeowners. The wires are in place already, you just connect them to a new piece of hardware.
If there is no existing doorbell wiring in your home and you want a wired installation, then hire an electrician. The transformer hooks into your home’s 120V, which is lethal if you don’t have electrical training.
Before You Begin What Do You Need
The strength of the WiFi signal at your front door. While standing on your front door, check the signals with your phone. However, a smart doorbell needs to stay connected to wifi; if the smartphone signals are weak where the mount is, so will be the doorbell. However, most doorbells operate on anywhere between -65 dBm and -70 dBm minimum signal. Mount the doorbell anywhere in your house. If you have a weak signal, you can place a WiFi extender on your front door itself.
Wires from the existing doorbell (for wired). To find out, if you have an old doorbell, unscrew it from the wall and see behind. If there are two skinny wires sticking out of it, you already have existing doorbell wiring and can add a wired smart doorbell. No power means you have to opt for the battery-operated version or get new wiring installed by an electrician.
Transformer voltage (for wired installation). Smart doorbell: 16-24V AC input from a door bell transformer. Also, your current transformer might be undersized (many older homes utilize 8–10V transformers that are unsuitable for a smart doorbell). You can read the voltage on top of the transformer (which is most commonly found in your basement, utility closet, or near the electrical panel) or you can test with a multimeter at the doorbell location.
Tools You Will Need
For wireless (battery) installation:
- Phillips head screwdriver
- Drill (masonry or wood bits for the mounting bracket)
- a Level (or free level app on your phone)
- Pencil for marking holes
For wired installation (add these):
- Voltage tester or multimeter
- Wire strippers
- Needle-nose pliers
- Small flathead screwdriver (for wire terminals)
Most smart doorbells include the following:mounting bracketscrewswall anchorswedge mount (to angle the camera)security screwdriver Don’t buy extra tools before checking your package!
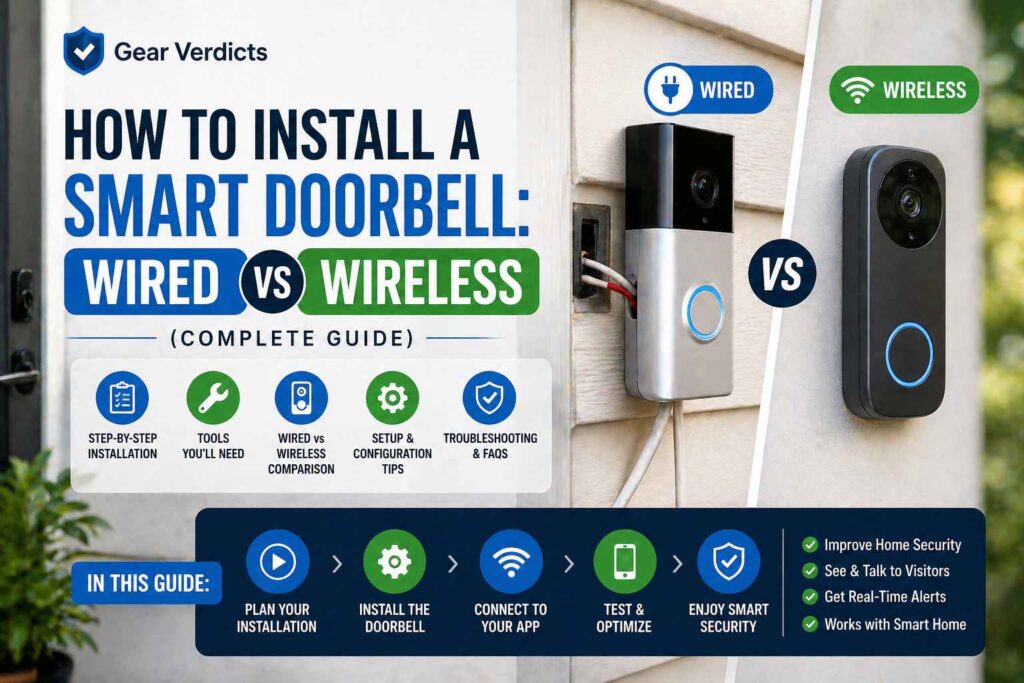
Wireless (Battery Running) — How to Run from Step 01?
Compatible [with]: Eufy E340 (battery version), Ring Video Doorbell 4, Aqara G4 (battery version), TP-Link Tapo D225 and all battery-powered smart doorbells
Total time: 15-30 minutes. No electrical work required.
Step 1: Powering Up the Battery (Charge for 1-3 hours before use)
Before installing, charge the battery of the doorbell. Smart doorbells mostly charge through the usual USB-C or micro-USB connections, and even takes between two to four hours to get fully charged. Without a doubt do not skip this step, for all the money spent on a wireless doorbell, it is considerably more hassle if said doorbell has to be taken down in days for recharging after putting up a seemingly half-charged device.
Eufy E340 is charged with USB-C (full in about 3–5 hours). Another USB Type-C (for recharging purposes, normal charging time approx. 4-6 hours) Ring Video Doorbell 4. While the Aqara G4 takes standard AA batteries, they are non-rechargeable, pop in a new set before you mount it.
Step 02: Download the App and Register your profile
Before you mount the doorbell, download the manufacturer’s app:
- Eufy: eufy Security app (iOS/Android)
- Ring: Ring app (iOS/Android)
- Aqara: Aqara Home app (iOS/Android)
- TP-Link: Tapo app (iOS/Android)
Register and prepare to add a new device. This app will guide you through the process of linking the doorbell to your WiFi network, something that is much easier to achieve before going ahead and affixing it to your wall, as you’ll be scanning a QR code on the back of the unit.
Step 3: Select Your Mounting Location
Stick the doorbell at a height between 48 and 52 in from the floor (120 to 130 cm). This puts the camera approximately at the chest height of an average adult, which should provide the best angle for getting faces in.
Place the doorbell on latch side (the side with door handle), not hinge side. This provides visitors an area to naturally stand in that results in them being captured by the camera.
See live camera footage on your phone by holding the doorbell up in place before drilling any holes. Back the camera out until you can see a visitor’s face, the entire doorstep (to spot packages), and as much of the 5 to 6-foot area leading up to your door.
If pushing the camera up against a wall leads to a bad angle, use the angled wedge mount that comes in the box. This helps tilt the camera 15-25 degrees left or right for a better field of view.
Step 4: Mount the Bracket
Mark the positions for beta screws using the included positioning sticker or template. It is thus free of guesswork and guarantees proper bracket centering.
For wood surfaces (door frames, wood siding): Drill pilot holes and directly screw in the mounting bracket using included screws.
For brick, stucco or concrete: Drill holes using a masonry bit and insert the accompanying wall anchors before screwing in the bracket. Wall anchors are critical — if you screw directly into masonry it will create an inaccurate mount.
Placement of the Bracket Make sure that the bracket is absolutely straight with a level. An unevenly-mounted doorbell might affect the camera field of view and overall looks unprofessional.
Step 5: Mount the Doorbell on the Bracket
If the parameter of the doorbell is separate from the unit, charge it and insert in. Now, clip or slide the doorbell onto the bracket that was previously mounted. Charles: So after, you know, the majority of smart doorbells actually click into place.
Secure any security screws with the included security screwdriver; this helps ensure that someone could not just easily pull the doorbell off the wall.
Step 6: Complete App Setup
The app will take you through:
- Connecting to your WiFi network (the best practice is to connect over 2.4GHz, the range with most doorbells only provides weak or no support for 5GHz performance at distance)
- Configuring your motion detection zones (eg: avoid the street and sidewalk in order not to bomb you with false alerts)
- Configuring notification preferences
- Linking with your smart home ecosystem (Alexa, Google Assistant, or HomeKit)
- If option, pairing the indoor chime unit
Press the button of doorbell to test it, make sure you get any notifications on your mobile phone. Confirming motion alerts are working (walk across the detection zone) Test the live video feed from within your home and outside of WiFi range (by using cellular data) to make sure remote access is operational.
You are done. Setup of the app takes 15–30 min according to you.
Wired Install — Step by Step (Replacing a Doorbell Already There)
Compatible with: Eufy E340 (wired), Ring Video Doorbell 4 (hardwire), Aqara G4 (wired mode) and any wired compatible smart doorbell.
Total time: 30-60 minutes. Basic DIY skills required.
SAFETY WARNING: Always turn off power at the circuit breaker before touching doorbell wires. Doorbell wires operate at a low voltage, typically 16-24V, but the transformer of your doorbell plugs into the home in the same way that an appliance or outlet attaches to your home’s 120V system. Disabling the breaker does so from the transformer side in that circuit.
Step 1: Power Off at the Circuit Breaker
Find your electrical panel (breaker box) in the home. Locate the breaker marked “Doorbell” or “Front Door” and turn it off. If none of the breakers are labeled, turn off the main breaker just to be sure.
Check to see if the power is off by pressing your existing doorbell button; if the chime does not ring, the power is off. After removing the old unit, to be on the safe side, use a voltage tester on the doorbell wires.
Step two: Take out your aged doorbell
Screw the old doorbell out of the wall with a screwdriver. Tug it gently out from the wall and you will see two thin wires connected to screw terminals on its back. Unscrew the terminal then remove both wires from it.
STOP: Bend those wires at 90 degrees and push them against the wall to prevent them from falling back into the wall cavity. If those wires go into the wall, you have to fish them out somewhere, irritating and time-consuming. Other installers can take a small scrap of tape, wrap the insulation wires, and then edge the cables to the wall.
Step 3: Test the voltage of your transformer
Check that your existing transformer is properly rated for the new doorbell before connecting the device. Most smart doorbells operate on a 16-24V AC. Weak transformers (not uncommon is older homes) with 8-10V of supply possible.
Volts can be checked in two ways:
Keep reading the label on your transformer (which is typically found on a metal plate attached to that box in your basement, utility closet or near the electrical panel.
Apply a multimeter — set it to AC voltage at the two doorbell wires at the area where you fsdfording. If it falls under 16V you will need to change the transformer.
Transfer transformers are $15-$25 on Amazon and a direct swap out but it is easier to swap a transformer than sneak in 120V connections. Install Your Power: If you’re not comfortable with electrical work, hire an electrician for this step only ($50-$100 service call)
Import the Chime Connector (if requested as step 4)
Some smart doorbells come with a little device called a chime connector or bypass kit — like a small version of your old indoor chime that you plug into the existing chime box. This way, you can continue to use your original chime alongside the newly installed smart doorbell.
To install it:
- Remove cover on your inside chime box (typically a fancy cover that pops off or unscrews)
- Find the two terminal screws on the control labeled Front and Trans
- Link the wires for the chime connector to those contacts (consult your specific doorbell’s manual, as wire colors and contacts differ between most brand sets)
- Close the chime box cover
If you want your new smart doorbell to sound your existing in-home chime, not all of them will require a chime connector. Check the installation guide for your specific model, and if it doesn’t come with one in the box you probably won’t need it.
Step 5: Mount the Bracket and Wire
Secure the bracket for the new doorbell to the wall – threading the two existing wires through the hole in the middle of it. Using the pilot holes from the former doorbell, screw the bracket into place (again, if the spacing between screws is larger than before, you may have to drill new ones).
Join it to the connecting wires on the behind of your smart doorbell. Polarity is irrelevant for most smart doorbells — any wire can go on either terminal. Wind each individual wire around the screw terminal so that it wraps toward (the right) and tighten securely. The number one reason for irregular power problems is a free connection.
Step6: Mount the Doorbell and Turn on the Power
Mount the doorbell by either clipping it or sliding it in to the bracket. Tighten security screws. Head back to your electrical panel, turn the breaker for the doorbell back on.
The doorbell should fully power within 30–60 seconds. If not, examine: the breaker it’s turned on, the wires connection are good & touch each other, your transformer voltage is within low power of between doorbell and transformer.
Step 7: Complete App Setup
You will then go through the same app setup process described above in the wireless section: download and install the app, connect to WiFi and set motion zones; configure notifications; test out all three doorbell button presses (motion detection and live video feed).
For wired setups, one more step: in the app check to confirm it says “Charging” or “Wired Power”. If your app shows power being supplied by the battery only even though hardwired, a loose wiring connection or weak transformer voltage is possible.
Learning Opportunity: Some Common Installation Mistakes
Common Pitfall # 1: Drilling holes without first checking for WiFi signal
We have the most common installation problem here. You install the doorbell, finish the setup, and find that your WiFi is not strong enough to support livestreaming video. You can also tell who is running away with all your stuff now you have holes in the wall and a doorbell that keeps dropping.
SOLUTION: Measure WiFi signal at the exact mounting location BEFORE drilling. If the signal is weak(less than -70 dBm), first, configure a WiFi extender/mesh WiFi node in your front door position.
Error number two: mounted way too higher or much as well reduced
A common height for mounting the doorbell is at chest height (60 inches / 150cm), which seems logical, but records visitors from the chest up, failing to catch packages on the floor. Too low (36 inches/90cm) are taking packages but missing faces.
How to fix: Mount 48–52 inches above the floor (120–130cm). This height allows both faces and the doorstep area. Your ideal height may vary if your doorbell is dual-camera (like the Eufy E340). Check with the manufacturer.
Error 3: You finished your project, but you forgot to check motion zones
By default, most motion detection zones include the entire field of view, meaning your street, sidewalk, and neighbor’s yard. This leads to a slew of false alarms every day from passing cars, people, and animals.
Fix: Take 5 minutes to set custom motion zones on the app right after setting it up. Do not include the street, sidewalk, or areas off your property. To ensure that the alerts are triggered correctly, do testing by walking through the zone yourself.
Except for TV sets: Mistake 4: Doubtful Wiring Return (cable installation)
Old doorbell wires can slip into the wall cavity when you disconnect them, and they will need to be retrieved before connecting a new chime transformer. Getting them back is a much larger ordeal, as it requires fishing wire tools or cutting into the wall, so 30 minutes can suddenly become several hours.
Fix: The moment you detach the wires, bend them instantaneously at ninety levels versus the wall surface of your home and after that tape them in. Never place them down ever.
Error 5: Ignore (wired install) the transformer check
Connecting a smart doorbell that requires 16-24V to an old 8 -10V transformer leads to: the doorbell not turning on, somewhat working(online primarily), quickly draining battery (the doorbell reverts to battery backup since wired power cannot support it) or fully rebooting constantly.
Solution: Verify the transformer voltage rating on the label or with a multimeter prior to connecting new doorbell. If it is not a transformer less than 16V ($15-$25 on Amazon) simply replace that.
Error # 6: Screwing down security too tight
The security screw prevents theft but not structural or mechanical. If you over-tighten, it could crack the doorbell housing or strip the screw head, making it impossible to remove the battery or fix it later.
Solution: Do up the security screw just until its tight (Not till it stops turning) You will have ample opportunity to take this out with the security screwdriver included.
Troubleshooting: What to do if something goes wrong
Doorbell not connecting to WiFi
Plausible reason: The doorbell is trying to connect to a 5GHz network. Other smart doorbells either only support 2.4GHz WiFi or have poor performance on 5GHz at the typical distance between your router and front door. Before going through the setup process on your phone, connect to the 2.4GHz network or just switch off the 5GHz band on your router for a while.
Second Reason: Wrong WiFi password Its smart doorbell apps do not always clearly display bad password error messages — only “connection failed,” unhelpfully. Verify the WiFi password (upper/lower).
The doorbell powers on but goes offline frequently
Customer is facing an electricity issue, which keeps messing around with the wifi connectivity almost always. And so we need to set this back on by changing the battery order on these devices.
Wired: Inspect wire connections, loose wires = intermittent power when disconnected. Note the transformer voltage as well, a borderline transformer (exactly 16V without margin) may not be able to hold its power as required when loaded.
Hear that: test wifi signal strength. However, if WiFi is weak, the doorbell will consume power to reconnect but disconnect a lot; hence it gives much faster battery draining. For example, usually the problems of connectivity and battery life are solved in one place by a WiFi extender.
Secondary chime does not ring upon button press
Reason 1: Chime connector not installed or wired incorrectly. Once done, re-check that you installed the connector for the chime according to your model.
Reason 2: The chime you currently use won’t work. Smart doorbells do not work with some old mechanical chimes. Digital chimes are also more standardized. Leave on top of the manufacturer chime compatibility list — Ring, Eufy and Aqara all publish a list of compatible chimes on their sites.
Reason 3: The in-app chime is turned off. A few doorbells will default to only sending notifications via the app and disable the physical chime. Verify the chime settings within the doorbell app.
Constant motion detection triggers or none at all
Among the possible solutions, here are three top-rated ones: Too many false alerts: Lower the motion detection capabilities in-app and set up custom zones so that any triggered action by alarm only happens within your property line and not along the street or sidewalk or other places with heavy traffic.
No alerts at all: You have to set sensitivity more, make sure motion detection activated in the app and notification permissions accepted on your phone. Double-check the detection mode — if you set it to “People Only,” the doorbell ignores vehicles and animals, which might be appropriate for your uses or simply over-restrictive.
Video feed is blurry or laggy
Cause: Insufficient WiFi bandwidth. 2K video stream of smart doorbells = 4-6 Mbps upload speed If your internet or WiFi is unable to handle this, it simply reduces the quality of video or lags.
Solution: Test your internet speed at the location of the door bell by using a phone speed test app. If the upload speed is less than 5 Mbps, get a WiFi range on it or change your Internet plan to high-speed updrade (as this doorbell operates in higher required bandwidth mode) or switch Bakra Mera | 1080p Mode.
Renter-Friendly Installation Tips
In case you have a rental house, possibly You can not drill holes or alter anything. Here are alternatives:
No-drill adhesive mounts. A few brands offer an adhesive mounting kit that replaces screws with industrial-strength tape. These bear the weight of a doorbell securely on hard surfaces (painted walls, vinyl siding, glass). They do not work for textured stucco, rough brick.
Peephole mounts. If you have a more traditional peephole in your door, as long as it isn’t fucked up so bad that light is leaking through the cracks (Ring’s Peephole Cam will be the most popular because it’s a viable replacement on very many ‘modern’ apartments), you an unscrew that and screw one on instead. It then mounts from within the peephole opening, no drilling necessary.
Suction cup mounts (temporary). While suction cups mounts are a temporary solution for glass storm doors or smooth metal doors, when removed they leave zero marks.
Battery-only models. Hire always battery-powered models Wired setup requires altering electrical systems; in many cases this typically isn’t permitted by rental contracts with out landlord approval.
Always go with battery-powered models, wired setup requires altering electrical systems, which typically isn’t permitted by rental contracts without landlord approval. If you’re still choosing a model, check our guide to the subscription-free smart doorbells that work well in rentals.
Battery-powered doorbells come off cleanly when you move: just unscrew the bracket, spackle any tiny screw holes, and take the doorbell with you.
Frequently Asked Questions
Can you DIY-install a smart doorbell?
Models powered by battery need not have any knowledge of wire and take 15-30 minutes. If you want to wire over an existing doorbell, installation takes 30-60 minutes and needs basic DIY confidence. New wired installations (with no existing wiring) need an electrician.
Do I require any existing doorbell wiring?
Not at all — Battery-powered smart doorbell (Eufy E340, Ring Video Doorbell 4, Aqara G4) won’t need wiring. Charge the battery, fix the bracket, connect to WiFi. Only wired installations require existing wiring as the power source is continuous.
What Power Voltage Works With a Smart Doorbell?
That’s usually 16-24V AC which you would get from a doorbell transformer most of the time. This means that older homes sometimes have 8-10V transformers but they are too weak. Look for the voltage printed on your transformer, or check it input with a multimeter. Amazon has replacement transformers for $15-$25.
Battery life of a doorbell
If traffic and settings is right usually 1 — 6 months. The Eufy E340 does about 1-3 month with it. Ring Video Doorbell 4 Battery Life: Up to 3-4 months The Aqara G4 features user-replaceable AA batteries, rated to last 4-6 months. Battery life is increased by lowering motion sensitivity and video quality.
Can I install an apartment smart doorbell?
Yes. Select a battery-operated version with either an adhesive mount or a no-drill mount. No wiring modifications needed. After a move, just unscrew the bracket and fill any small screw holes with spackle. Many buildings don’t permit exterior changes — confirm with your landlord first. For renter-friendly picks, see our roundup of the best smart doorbells without a subscription.
Do smart doorbell function with out WiFi?
They still ring and sense movement, but you won’t get phone notifications or access the live feed or recorded clips without WiFi. A WiFi-less smart doorbell is very much like a normal doorbell.
Will my smart doorbell work with an existing chime?
However, as with all things smart doorbell related there are a few caveats; whilst most work with standard mechanical and digital chimes, not all do. Make sure to check the compatibility list offered by your favorite manufacturer before buying.
If your chime is not compatible, the only options left are to use the doorbell instead of a notification through the app, to purchase the wireless unit offered by the manufacturer, or to configure an Alexa/Google device as a chime (both Ring and Eufy make announcements on Echo and Nest speakers).
Ready to Choose the Right Smart Doorbell?
Now that you know how to install a smart doorbell, the real question is — which one is actually worth your money? Don’t guess. We’ve tested the top options so you can pick the best one for your setup.
👉 Pro tip: If you want zero monthly fees, start with Eufy. If you prefer Alexa integration, Ring might suit you better.